The handpieces of Vaniman sandblasters are all designed with parts that are easy to replace when they get worn down. Watch the video here to learn the simple process:
Link mentioned in the video: https://www.vaniman.com/tubing/
If you prefer written instructions, here’s the process in text form:
Just a few simple steps…
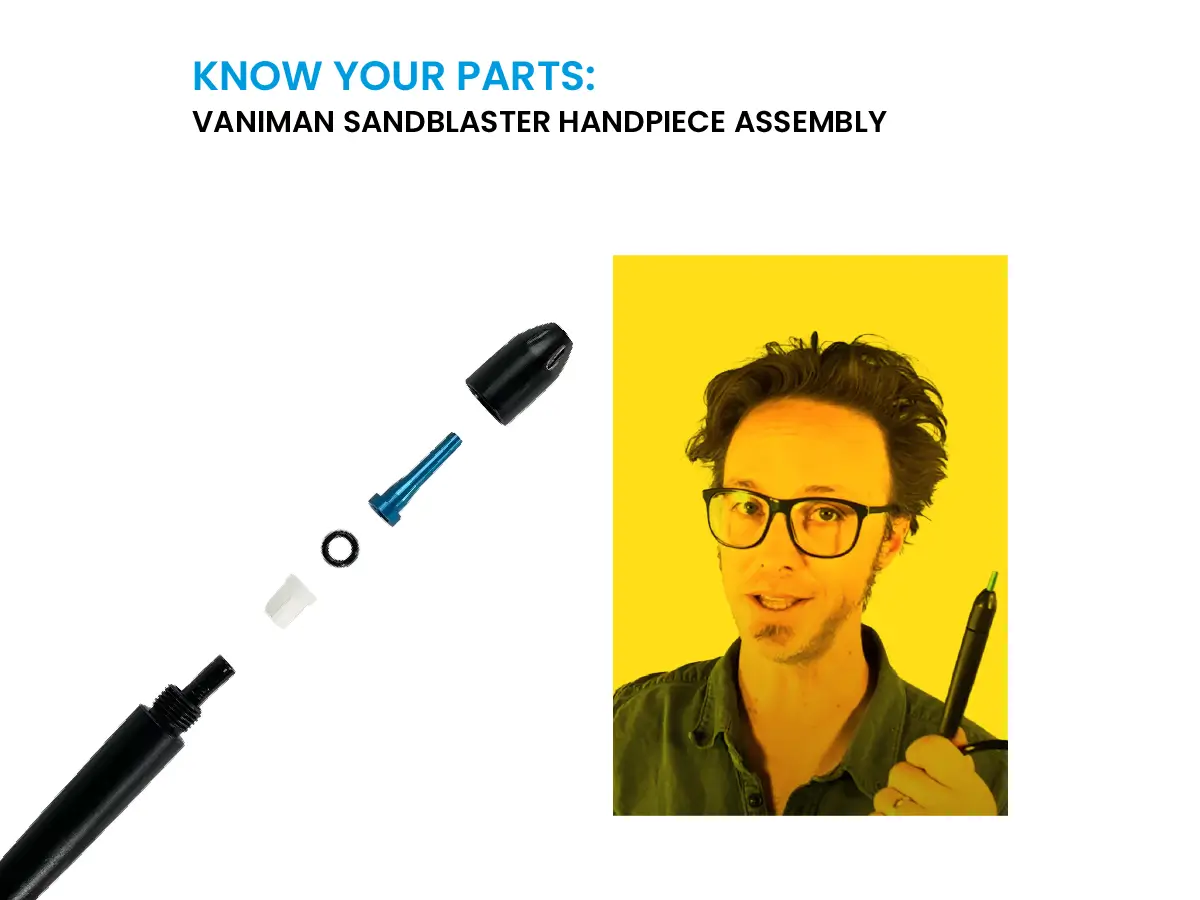
Know your parts: the tubing, the handle, the handle insert, the o-ring, the tip, and the nozzle cap.
Once you’ve got your handpiece and tubing free from the tank, you can take it apart.
If you’re just replacing the tip or an o-ring, you’ll only need this first part.
Unscrew the nozzle cap, and…that’s it! Your tip and the o-ring come right out. You can insert the new tip, and the new o-ring behind it, and screw the nozzle cap back on.
If you’re replacing tubing, there’s a little more work — but just a little.
To start, make sure the nozzle cap is removed. Then hold the handpiece and push the tubing up into it — use a flat head screwdriver or even a butter knife to slip between the handpiece insert if you need to — and the insert will separate. (This is what holds your black tubing in place.)
Once you’ve separated the insert from the handle, you can pull that tubing out of the handle and you can gently pry the insert off the tubing.
Make sure the end of your new tubing is cut at a 90-degree angle before you attach it to the insert.
Pro tip: use some kind of lubricant on the end of the tube — a small amount of Windex, Simple Green, soapy water, etc. will do the trick.
Then, push the tubing into the handpiece insert as far as you can with your hands, and then you’ll want to tap on it more to really make sure the end of the tubing is FLUSH with the edge of the handpiece insert. You don’t want any leaks. It’s really important to create a complete seal when you put it all back together.
Slip the free end of the tubing back down through the handpiece handle and pull it taught to get that insert back in place.
Once it’s in, you can put the o-ring, tip and cap back on.
Then you can insert that tubing back in your blaster cabinet (if you’ve got a blaster with a cabinet), through the pinch valve (if you’ve got an instant-off model), and back to the tank.
…And remember that when you put it back into the quick-connect at the bottom of the tank, it needs to be pushed in beyond the o-ring.
If you do have an instant-off sandblaster, remember also that it’s important to move that tubing back and forth through the pinch valve casing pretty often, because this is one of the greatest points of wear on your handpiece tubing.
And that’s it! If you’ve got any questions, you can email service@vaniman.com or call us at (760) 723-1498.