Diagnosing Bad Brushes
If your motor stopped working here are some questions you can ask yourself to diagnose your dust collector motor:
1. Do I have a brush motor?
All of our dust collector motors have brushes in them except for the Stone Vac II Brushless and the V-Six. Some of the Stone Vac II units come with a brush motor so check the cover panel to see if you have a brushless motor. If it doesn’t say brushless on it then you do have brushes. The V-Six motor does not have brushes.
a. What are brushes?
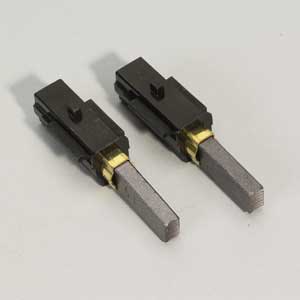
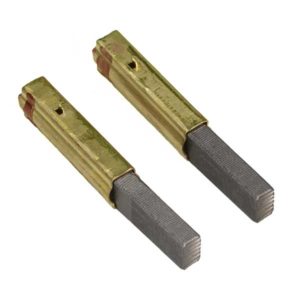
Brushes are used to conduct electricity to the motor allowing it to run. No, these are not the type of brushes that have bristles. These brushes are made of graphite and can be seen here.
b. Which brushes does my motor take?
If you have a Blue Dot Motor then you will need the Blue Dot Brushes and if don’t then you will need Non-Blue Dot Brushes. You can find out which motor you have by going to the product page of your dust collector.
2. Have I replaced the brushes before?
The role of the brushes is to create the current to start the rotation of the motor. The brushes are made out of a graphite material and wear down which eventually stops the connection to the commutator. This is generally the reason as to why a motor will stop working. One thing to remember is that each time you replace the brushes the commutator gets more abrasive causing the brushes to wear faster.
a. Yes. How many brushes have I replaced?
After three brush replacements, it is recommended that the motor gets replaced. The commutator will shred through the brushes rather quickly so buying a new motor will fix that problem.
b. No.
The brushes need to be replaced.
Replacing the Motor Brushes
Before continuing, be sure to know which motor you have because the brush replacement can be different. The easiest way to determine this is by going to the product page of your dust collector and looking under the replacement parts. If you cannot determine which motor you have then please call us at (800) 826-4626.
Instructions
Generally, you will need to remove the motor to gain access to the brushes unless you have a Stone Vac II or an Abrasive Vac/SandVac. The cover panel just needs to be removed. If you need help removing your motor please visit our Tech Tips and find your dust collector. We have videos for each.
Things you will need:
1. Phillips head screwdriver
2. Flathead screwdriver (optional)
Blue Dot Motor
- Remove the plastic fan housing cover from the top of the motor which is held on by plastic hooks over the motor brush cases. While applying an upward force on one side of the fan housing, use a screwdriver to unhook the two plastic hooks over the motor brush case. Repeat on the other side of the fan housing.
- Using a Phillips screwdriver, loosen the screws from the brass metal strap that holds the brush. It is not necessary to remove the strap. Raise the brush housing slightly until it will slide out from under the strap.
- Replace with a new brush noting that the tab on the case goes down. Slide the brush case back and forth until the tab “locks” into place. Tighten the Phillips screws that retain the metal strap. Repeat this process for the other brush.
- Replace the fan housing by pushing down firmly so that it “locks” onto the motor.
Non-Blue Dot Motor
- Remove the plastic fan housing from the top of the motor which is held on by both metal and plastic hooks over the motor brush cases. Using a screwdriver, bend the metal hook back one side of the motor so that the plastic fan housing has clearance to be removed. While using upward pressure on one side of the fan housing, use a screwdriver to unhook the two plastic hooks over the motor brush case. Repeat on the other side of the fan housing. Turn the armature and check for roughness and motor bearings for looseness before proceeding. If either is bad then the motor must be replaced.
- Locate the plastic brush cases on top of the motor. Complete the replacement procedure one brush at a time so that the other brush may serve as an example. Using a Phillips screwdriver, remove the screws from the metal strap that holds the brush. Remove the metal strap and raise the plastic case slightly so that you can work on it. Be careful not to break the wire where it connects to the wire contact.
- The wire contact must be carefully slid out from between the plastic case and brass case (see the diagrams on page). First, try sliding the contact out by gently prying, with a flat blade screwdriver, between the wire and plastic case (see TOP VIEW). Do not force. If the contact does not readily slide out, the “barb” on the wire contact may be caught in the plastic case. Second, slide a small screwdriver (1/8” wide blade) between the plastic case and the wire contact as shown. Pry up, working the contact out. This action lifts the plastic case to help disengage the barb.
- Replace with a new brush noting that the tab on the case goes down. Slide the wire contact into the brush case between the brass case and plastic case. Gently push the carbon brush back into the case against the spring pressure. Set the brush case onto the motor directing the tab into the groove in the mounting base. Then slide the brush case back and forth until the tab “locks” into place. Replace the metal strap and fasten in place with the Phillips screws.
- Carefully, put the plastic fan housing back onto the motor without disrupting the wires. The plastic hooks should lock into place, then bend both of the metal hooks back to their original location.
Replacements
Motor Brushes, Blue Dot – 97010
Motor Brushes (Old Style)- VMC-1028
